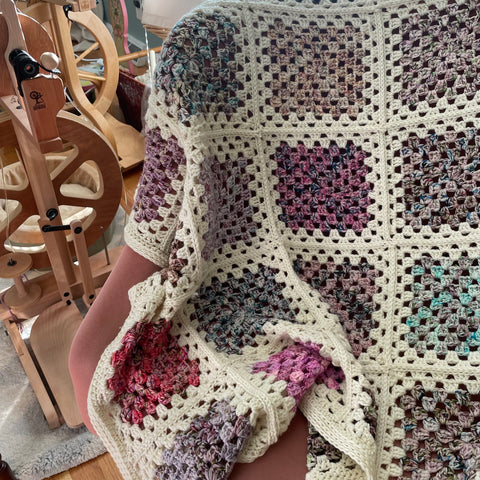
As we made plans for our Advent box photos, I took on the project of crocheting granny squares as color swatches for each day. Once I had all these granny squares, I figured I needed to use them for some kind of project! I'm never one to let yarn go to waste! I used a basic granny square dressed up with some bare yarn to create this fun lapghan that is reminiscent of a scrappy quilt. I am not a pattern writer by any means but thought I would share a quick recipe for how I made this blanket it you were interested in making one for yourself!
For this blanket, I used our advent box set minus the full skein so it was 24 mini skeins in assorted colors and I also used a cone of undyed DK weight yarn. I don't know the exact yardage of the bare yarn I used but I suspect it would be around 5 100g skeins worth since I used about half the cone. Each mini skein (ours were 92 yds/20 grams of fingering weight) was enough to squeak out 2 granny squares. I held the fingering weight minis double for my crocheted granny squares to make them a little thicker. To do this, I just wound the mini's and held both ends of the skein to work the squares and it was just enough yardage to make 2 squares with each skein with no yarn leftover. If you're a looser crocheter or don't want to risk running out (which I did on one or two but just filled in the gap with the bare yarn, than you might want to make smaller granny's and use more sashing yarn. Or you could use one strand of the mini and a second strand of some other yarn and marl them together. The options really are endless.
I used a very basic granny square technique of which they are many tutorials you can find online, like this one by Spruce Crafts. To make a granny square: CH 4 then slip stitch to beginning of chain to make a circle. CH 2 then into the circle DC, DC, CH 3, DC, DC, DC, CH 3, DC, DC, DC, CH 3, DC, DC, DC, CH 3, DC and slip stitch to your first CH 2 completing the first round into a circle made up of 4 blocks of 3 double crochets with CH 3 spaces in the corners.
To begin the 2nd round you CH 3 (this counts as your first DC and a chain) and work 3 DC in each single CH space and in each corner you work DC, CH 3, DC into the CH 3 corner of the round before until you get back to the beginning of the round where you slip stitch to the first chain of the round.
Each subsequent round begins with either a CH 2 or CH 3 depending on if are working into a chain space (then you CH 2 and work 2 more DC to fill the space) or you CH 3 to create one DC at the end of the previous chain space and a single chain to carry you to the next DC cluster.
For my granny squares, I completed 5 rounds using the advent minis and then 2 more rounds with the bare sashing yarn for a total of 7 round granny squares. Yours could be however large or small you would like them to be, as that is the wonderful nature of granny squares.
At the end of each square I wove in my ends and set it aside until I had made all 36 squares. My blanket is a 6 square x 6 square lapghan size, but my advent set had enough yarn to make an additional 12 squares if so desired. I seamed my squares together in strips of 6 using a basic crochet slip stitch, but you could use any method you like. The slip stitch creates a neat ridge on the front which creates a nice visual seam between squares.
Once I had my six strips of 6 squares, I went ahead and wet blocked them since it would be hard to do with the whole blanket complete. That part is completely optional.
I connected my blocked strips with the same crochet slip stitch seaming into rows of six, taking care not to put the same colors next to each other since I had 2 squares of some of the colors.
Once the blanket was all seamed together, I added a simple border which again is easily customizable. I made the border using the camel stitch, which again there are many tutorials for like this video by Bella Coco Crochet. I started the border by single crocheting into each stitch all the way around (adding 2 SC into each corner stitch) to create a base for the border, then slip stitched back to the beginning. For the second round, I HDC in each stitch all the way around, with a HDC, CH 1, HDC in the corner. The third round is the same except making the HDC in the 3rd (back) loop of each stitch, and working the HDC, CH 1, HDC in the corners. Then you can add as many rounds as you like to make layers of stripes for the border. I made mine with 3 rounds of HDC.
I then steam blocked the whole piece to loosen up the seam stitches that didn't get wet blocked.
All in all, it was a very basic granny square all slip stitched together but the options are endless since it could be any size you wanted with any border you like. Using a fingering weight held double makes it heavy enough to keep you cozy but not super heavy that it couldn't be used all year. I might have to make another one using up all my DK scraps!!
Happy Making!
Anne